
TL;DR
Moving your rig into a closet or another room is the most effective way to reduce noise. Proper placement and ventilation are key to making a tiny closet into a usable, sound-controlled space without deadening the sound or trapping heat.
Ever notice how a noisy computer or gaming rig can turn your workspace into a constant hum? The truth is, the best way to quiet it isn’t always fancy foam or absorbing panels. Sometimes, the smartest move is simply giving your rig a new home—like a closet or spare room—far away from where you work and think. Acoustic Dampening, Placement, and the “Rig in the Closet” Setup That’s what this guide is about: how to make the most of a tiny closet, dampen sound, and keep your equipment cool without turning your space into a soundproof dungeon.
If you’re tired of the fan noise drowning out your ideas or your voice-over recordings sounding echoey and boxy, you’re about to discover game-changing tips. From placement tricks to ventilation solutions, you’ll learn how to turn a cramped closet into a quiet, functional hub for your AI rigs or recording needs.
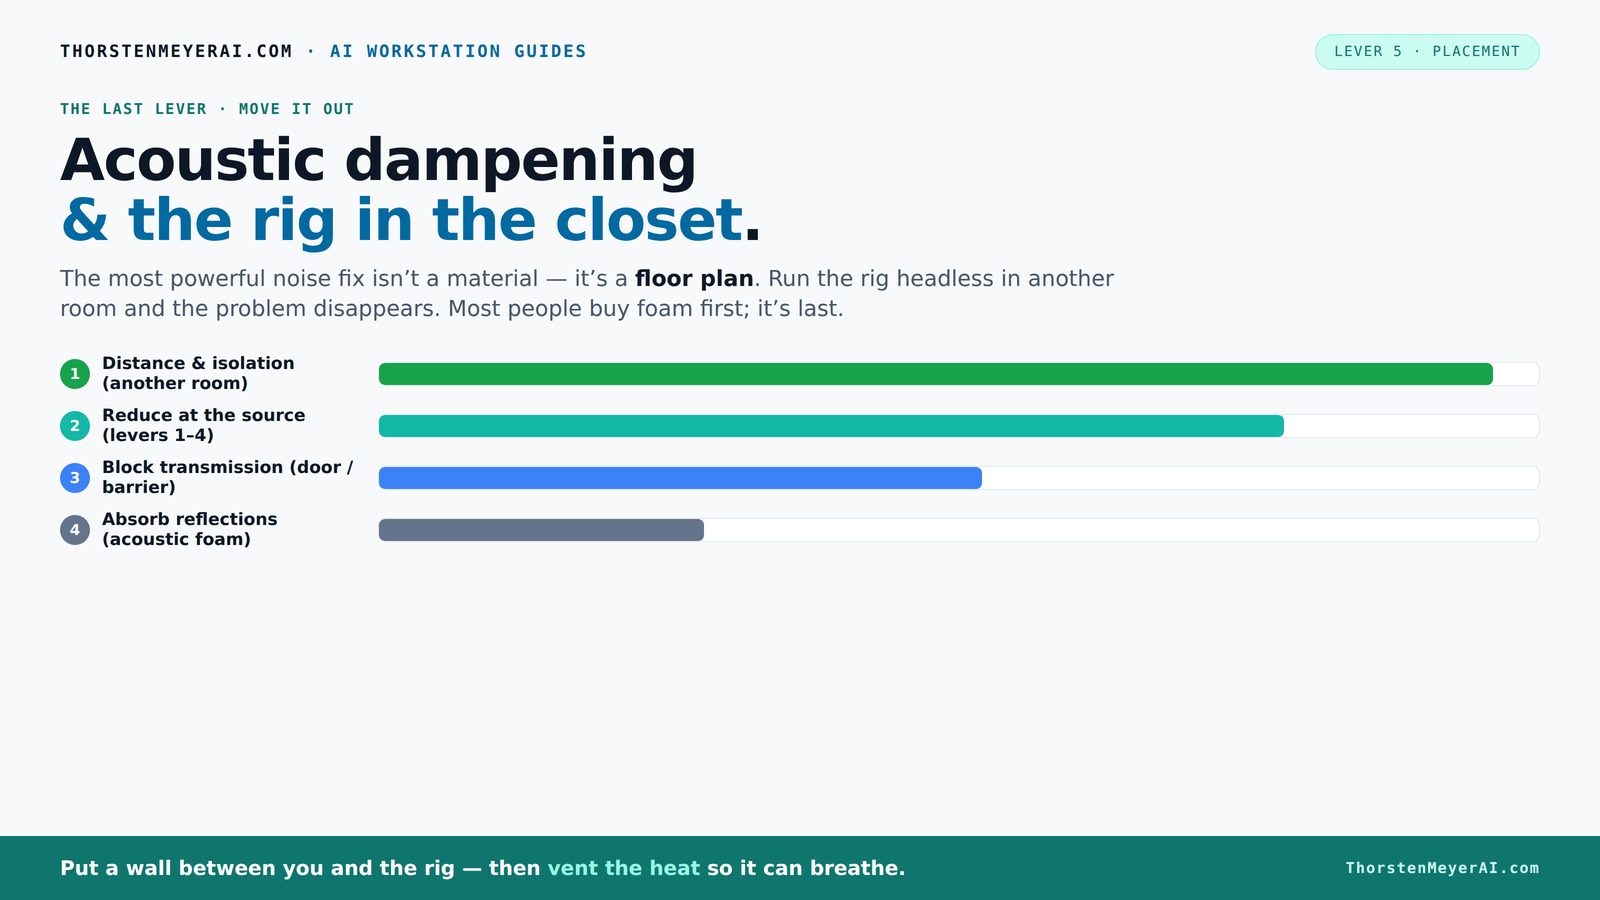
Acoustic dampening
& the rig in the closet.
The most powerful noise fix isn’t a material — it’s a floor plan. A rig you can’t hear because it’s in another room beats any amount of foam. Tap the approaches in Part 1 to see what actually works.
(another room)
(levers 1–4)
(door / barrier)
(acoustic foam)
Contain the noise, not the heat
Key Takeaways
- Moving your rig into another room or closet drastically reduces noise compared to relying solely on foam treatment.
- Proper ventilation is critical in enclosed spaces—use passive vents, exhaust fans, or purpose-built soundproof cabinets to keep equipment cool.
- Treat the first reflection points and corners with panels and bass traps for optimal sound quality in tiny spaces.
- Blankets and DIY materials work well if strategically placed, but avoid wasting material on low-value surfaces.
- Understand that soundproofing and acoustic treatment serve different roles—combine both for the quietest, clearest setup.

24 Pack Black 12 x 12 x 2 Inches Pyramid Designed Acoustic Foam Panels, Sound Proof Foam Panels for Walls, High Density and Flame-Retardant Acoustic Panels, Sound Panels for Recording and Home Studio
Exceptional Sound Absorption:These pyramid acoustic panels are engineered to effectively absorb sound waves, reducing echo and reverberation. With...
As an affiliate, we earn on qualifying purchases.
As an affiliate, we earn on qualifying purchases.
Why Distance Beats Foam Every Time for Noise Control
Distance is the silent hero in noise reduction. Learn more about astrophotography and soundproofing techniques at astrophotographyhq.com When you move your rig into another room or a closet, you cut down sound transmission more than any foam panel ever could. Think of it like this: the farther the sound source is from your microphone or listening position, the less it will be heard, because sound intensity diminishes with distance. This isn’t just about volume; it’s about reducing the energy that reaches your ears or mic, significantly lowering perceived noise levels.
Choosing to place your rig in a different room or a hidden corner isn’t just a convenience—it's a strategic move that offers a natural barrier. For example, a gaming PC on the other side of the basement can be humblingly quieter than a closet filled with foam panels. But this approach involves understanding tradeoffs: increased distance might mean longer cable runs, potential latency issues, or inconvenience in accessing your gear. Nonetheless, the reduction in noise can be dramatic—up to 90%—making foam treatment almost unnecessary if you can physically move the equipment away.
This method is especially beneficial for high-performance rigs or audio work, where clarity is crucial. By sitting comfortably at your desk and having the noisy machine in a distant room, you minimize distractions and improve your environment's acoustics. Proper ventilation remains essential here, as the physical separation alone isn’t enough—your gear still needs cooling, which can be achieved with ducting or dedicated airflow solutions. Learn about proper setup and placement for acoustic treatment

RUIX OV303 ATX Mid-Tower PC Case, Pre-Installed 4 x 120mm Prism ARGB PWM Fans, USB 3.0 & Type-C Ports, High-Airflow Gaming Computer Case - Black
【Pre-Installed Fan】4 high-performance 120mm ARGB prism gaming fans have already been installed.
As an affiliate, we earn on qualifying purchases.
As an affiliate, we earn on qualifying purchases.
How to Properly Ventilate a Closet Rig Without Turning It Into an Oven
Placing a heat-generating machine in a closet sounds perfect—quiet and out of sight. But sealed spaces trap heat, which can cause serious issues. Overheated rigs throttle their performance as thermal throttling kicks in, fans work harder and louder, and prolonged heat exposure risks hardware failure. The key is to establish a ventilation system that effectively dissipates heat without compromising noise reduction.
Start with passive ventilation—installing vents, grills, or small openings that allow natural airflow. These should be strategically placed to promote cross-ventilation, enabling cooler air to enter and hot air to escape. For more efficient cooling, add a quiet exhaust fan—preferably a low-noise, high-CFM model—that pulls hot air out, creating a gentle airflow inside. For example, a 120mm fan pulling 60 CFM, combined with a passive vent, can keep a small closet below 80°F even during intensive workloads. Proper airflow prevents heat buildup, which in turn minimizes noise from fans working overtime and preserves hardware longevity.
In high-end or continuous operation setups, consider a purpose-built soundproof cabinet with ducted airflow and thermostatic controls. These units integrate sound absorption with effective cooling, maintaining quiet operation without sacrificing thermal management. This balance between soundproofing and ventilation is crucial: too much sealing traps heat, but too little ventilation can let noise escape. The tradeoff involves choosing the right materials and configurations to meet your specific needs—quiet, cool, and efficient.

8" Room to Room Fan with Remote, Reversible Through Wall Fan for Quietly Circulating Air, 320 CFM Through the Wall Fan with Temperature Control, Durable Build Quality, In Wall Fan for Closet, Laundry
【QUIET, MOVE MASSIVE AIR】 This room to room fan quietly circulates air between two rooms to maintain a...
As an affiliate, we earn on qualifying purchases.
As an affiliate, we earn on qualifying purchases.
The Art of Placement: Where and How to Treat a Tiny Closet for Best Sound
Placement is king. In a tiny closet, you want to treat the first reflection points—those spots where sound bounces directly back to your microphone or speakers. See more about acoustic treatment placement Think of it like blocking the echoes that make vocals sound boomy or instruments muddy. Correct placement of acoustic treatment can dramatically improve clarity and reduce unwanted reverberations, which are especially problematic in small, enclosed spaces.
Start by identifying the first reflection points: the spots where sound from your microphone or speakers hits the wall and bounces back. Mount acoustic panels at ear level behind your mic and on the ceiling directly above. Use bass traps in the corners to tame low-frequency buildup, which is common in small, enclosed spaces. These areas tend to amplify bass, leading to muddy recordings or a boomy sound. A quick setup might include foam panels on the side walls, bass traps in each corner, and some soft furnishings or blankets on the door to absorb reflections. Explore DIY acoustic treatment tips These targeted placements prevent the room from becoming a dead, echo-filled box, maintaining a natural and lively sound that still retains clarity.
For example, a YouTube creator converted a tiny closet into a voice booth with just a few foam panels and a thick blanket over the door. The result: a space that sounds warm, controlled, and natural—without the hollow or metallic echo often associated with small rooms. The key is understanding that strategic placement of absorption materials maximizes their effectiveness, especially in tight spaces where every surface counts.

VEVOR Sound Dampening Blankets, Soundproof Curtains with 80 x 48 in, Soundproof Blanket with Grommets, Studio Grommeted Blanket, for Window, Door, Light Blocker, Music Recording, Black
Sound Absorption & Noise Reduction: Made with a polyester woven surface and recycled cotton filling, this 3-layer physical...
As an affiliate, we earn on qualifying purchases.
As an affiliate, we earn on qualifying purchases.
Blankets, Foam, and DIY Tricks: What Works Best Inside a Closet?
When it comes to acoustic treatment in a closet, materials matter but placement is king. Blankets, foam panels, and even mattresses can be surprisingly effective if placed correctly. But, a blanket over the door isn’t enough—combine it with foam panels on walls, ceiling, and door for real control. Understanding the specific acoustic properties of each material helps you make smarter choices. Learn more about acoustic dampening and placement Foam panels primarily absorb high frequencies, which reduces harshness and echo, while heavier blankets or mattresses tend to dampen mid to high frequencies and add some low-frequency absorption if dense enough.
For instance, a musician I know used heavy moving blankets hung with command hooks on the walls and a foam panel behind the mic. The difference? The space sounded tighter, with less echo and more warmth, without sounding dead. It’s important to remember that strategic placement is more effective than simply covering every surface. Focus on reflection points, corners, and areas where sound tends to bounce most. Materials like foam or blankets absorb high frequencies, but low-end issues require bass traps or dense materials placed in corners. Combining different materials in targeted locations yields a balanced, natural sound—without sacrificing liveliness or creating a dead room effect.
Corners and Surfaces: The Secret to Avoiding a Boxy Sound
Corners are where low frequencies like to gather and cause that boxy, “muddy” sound. Treating corners with bass traps is essential, especially in a tiny closet where sound waves bounce and amplify low-end buildup. Without proper treatment, these low frequencies will resonate and create a boomy, hollow sound that obscures vocals and instruments. Installing bass traps in the corners helps absorb these problematic frequencies, smoothing out the overall sound and providing clarity and warmth.
Picture your closet as a small box—without traps, low-frequency energy reverberates and emphasizes the space’s acoustic flaws. Bass traps effectively turn the space into a more balanced environment, preventing low-end buildup and making your recordings sound more natural. This is especially important if you record vocals or instruments that produce significant bass content; otherwise, your recordings risk sounding muffled or overly boomy.
For example, a DIY enthusiast used inexpensive rockwool bass traps in each corner of his closet studio. The low-frequency response improved dramatically, and his voice recordings gained depth without sounding muffled. Proper corner treatment is a crucial step in ensuring your small space doesn’t turn into a resonant echo chamber, providing a foundation for clear, professional-sounding recordings.
Soundproofing vs. Acoustic Treatment: What's the Difference?
Soundproofing and acoustic treatment are often confused, but they serve different purposes. Soundproofing blocks sound from escaping or entering a space—think sealed doors and thick walls—while acoustic treatment controls how sound behaves inside a room. Understanding this distinction is critical because each approach involves different materials, costs, and tradeoffs.
Inside a closet, adding mass—such as sealing gaps, using dense panels, or adding insulation—helps reduce sound transmission, making the space more isolated. This prevents noise leakage that might disturb others or be heard outside. However, soundproofing alone doesn’t improve the quality of sound within the space; it merely contains it. To achieve clarity and reduce echo, you need acoustic treatment—absorbing panels, bass traps, and diffusers—that manage how sound reflects and reverberates inside the room.
According to [soundproofing experts](https://soundproofcow.com/how-to-soundproof-closet/), combining both strategies yields the best results: sealing gaps, adding mass, and installing absorption materials inside. For example, sealing gaps around the door with weatherstripping and adding foam panels inside can turn a noisy closet into a quiet zone. But if the space still sounds echoey, more internal treatment—like foam panels and bass traps—is necessary to tame reflections and improve clarity. Recognizing the roles of each allows you to prioritize and design an effective, balanced setup that’s both quiet and acoustically controlled.
Frequently Asked Questions
How much foam or panel coverage do I need inside a closet?
Start with treating the first reflection points—behind the mic and on the ceiling. Then add bass traps in the corners if you notice low-end issues. Covering about 25-30% of the wall surface with absorption panels is a good rule of thumb for small spaces [4].Should I treat corners first or walls first?
Corners come first because low-frequency buildup causes the most boxy sound. Installing bass traps in the corners will make a noticeable difference in clarity and warmth [4][6].Do blankets work as well as panels or foam?
Blankets can be surprisingly effective for reducing reflections if hung properly on walls and doors. They’re best used in combination with foam panels on reflection points for a balanced sound [2][6].How do I prevent echo without deadening the space?
Treat the first reflection points and add some bass trapping. Avoid covering every surface—leave some space for natural sound to breathe. Proper placement prevents an overly dead, muffled sound [4][6].Can I soundproof a closet door?
Yes, sealing gaps with weatherstripping and adding a dense, sound-absorbing curtain or blanket can significantly reduce sound leakage. For better results, consider a door with built-in seals or a specialized acoustic door [3][5].Conclusion
Turning a tiny closet into a functional, quiet workspace isn’t just about stuffing foam everywhere. It’s about smart placement, good ventilation, and knowing when to move the rig out of the room altogether. Your best bet for a noise-free, cool, and professional setup is to think of it like a puzzle—each piece has its place and purpose.
Next time you hear the fan roar or echo bounce around, remember: a little strategic planning can turn chaos into calm. Your workspace, your sound—better, louder, clearer, and cooler. Now go build that closet studio and make your gear work for you, not against you.


![The Early History Of The Singular Value Decomposition (1993) [Pdf]](https://curiousminds.info/wp-content/uploads/2026/07/the-early-history-of-the-singular-value-decomposition-1993-pdf-featured-260x140.jpg)